Compressing photos in an iPhone sounds like a promising step towards space and storage. It would improve the performance of your device and allow you to store more data. But how to effectively reduce the size of images for an iPhone? Let’s learn the same in the following write-up.
Everybody appears to enjoy seeing pictures. On all of our smartphones, there are pictures of our children, relatives, friends, pets, and special places. A photo's size is one drawback—the format, resolution, dimensions, and other elements all impact a photo's file size.
Even if you may already have enough space for your photos, having that space is irrelevant when it comes time to send or upload one. Sending huge photographs in emails and texts can pressure the app and the person receiving them. Additionally, many social media and website platforms have constraints on the size of the photographs you can upload.
Since you prefer to take high-resolution photographs with your iPhone most of the time, it can be tough to upload them to different social media sites or send them via email to your near and dear ones. A variety of iPhone picture compressors are suggested for you if you're thinking about how to compress photographs on your phone. You can accomplish work at predetermined intervals because these apps' GUI features are useful and practical.
The iPhone's newest version is unveiled every year, and the cameras receive new functionality. The iPhone 11 was released in 2019 and featured selfies and ultra-wide shots in its camera. The iPhone 12 includes the new sensor-shift stabilisation, night mode portrait, and other improvements. But because of all these features, your iPhone's storage is impacted.
As usual, an app accomplishes this. We even created our own! Unless you specify otherwise, the only function of the program Shrink.media is to reduce the size of JPEG, PNG, and HEIF images while maintaining their original dimensions.
An App Exists for That.
Like many other apps, the App Store is full of photo compression tools. On the other hand, Shrink.media for iPhone and iPad is a free application with a user-friendly layout. Pixelbin created the software.
The Apple App Store offers Shrink.media without any cost. One of its best features is that this app compresses your photographs locally, without utilising the internet, on your iPhone.
The Pro version, which eliminates the advertisements and enables you to compress more than three photographs at once, is also available for your consideration. You can also access Shrink.media website from your Safari browser.
Why Should Photos on an iPad or iPhone Be Compressed?
1. Increase available storage without removing photos.
The iPhone's capability to capture stunning, vibrant photographs at a 12MPx resolution and videos at a 4K resolution has contributed to the device's appeal.
Nevertheless, this means that, depending on the color, each photo will range in size from 3MB to 5 MB. When you have approximately 3,000 photographs on your iPhone or iPad, there are typically up to 10GB to 20GB of photographs on your iPhone, which is a huge amount. Hence, reducing the file size of your iPhone's photograph files is a smart method for increasing the available storage capacity.
2. Save the Relatively Small Space on iCloud.
Photographs and other data may often be required to be synced to iCloud for backup purposes. Though it is inadequate for the volume of iOS data, iCloud only offers consumers 5GB of free storage.
If you need extra space, you could get 20GB of additional iCloud storage for $0.99 (Rs. 60) each month. Why not instead reduce their size before uploading them to iCloud? On your iCloud storage space, this can free up a significant amount of memory.
3. Increase your device's speed.
Since there isn't much personal information on your device when you initially purchase it, you can imagine how quickly your iPad or iPhone performs. Your iPhone or iPad will run faster once you condense your iPhone images and free up more iPhone memory, even though your smartphone might not operate as quickly as a brand-new one.
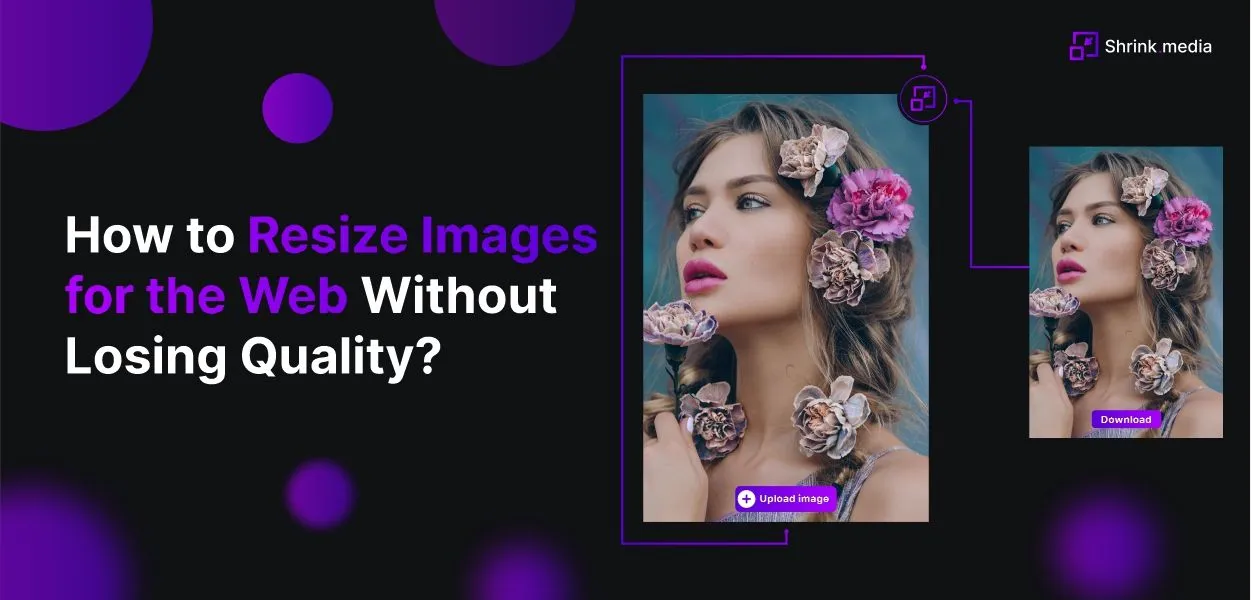
How To Compress The Size Of Photos Using Shrink.media On Your iPhone
Before commencing, it is important to recognize that Shrink.media will shrink the real size of your photographs and that it can also reduce the actual dimensions of the images, even though this is not its primary goal. If shrinking the size of an iPhone photo is what you're after, you can learn how to do it by reading our article.
Step 1 - Freely download Shrink.media from the Apple App Store.
Step 2 - Launch the application, then from the menu, select "Upload Image." Your entire iPhone's photo library will be visible. You should load the image or images you wish to compress in an album before selecting Next.
Step 3 - At this point, you can change the compression setting. Set the quality and dimension parameters as per your image requirements. To fit the file on this site, I cut its quality to 75% while reducing its size to 80% of its original dimension.
Step 4 - Press the button at the bottom to choose Compress. By applying its "magic," the application will reduce the file size of your pictures. Because there is so much to do, additional processing of photographs will take significantly longer. Although your results may vary, in my opinion, the application compressed each photo quite swiftly.
Step 5 - As soon as the application is completed processing the images, your iPhone will automatically download them to your Camera Roll. Then, they would be neatly added to the newly constructed, automatically generated album called Shrink.media.
Step 6 - In addition, you can erase actual photographs to free up space on your iPhone. Depending on your needs, you can choose between choosing this option and maintaining the original photo.
What are the Other Methods Which can be Used to Compress images on Any iPhone?
Other methods for compressing iPhone photos include
Method 1: Screenshot your iPhone's photographs and then compress them.
Even though it may seem odd, it works. If you only need a few compressed photos, taking screenshots of these pictures on your iPhone could serve as a quick and practical alternative. If necessary, resizing a photograph before sending it to friends, family, or coworkers is an efficient approach to conserve your limited cellular bandwidth.
How to take a screenshot of an image on an iPhone:
Step 2 - Select the photograph you want to compress, then open it.
Step 3 - On an iPhone 6s Plus, iPhone 6s, iPhone 6 Plus, iPhone 5s, or a device from a previous generation, please simultaneously press and hold the "Home + Sleep/Wake" and "Sleep/Wake" buttons. Please press and hold the "Power + Volume Up" keys all at once for an iPhone X, iPhone 8 Plus, iPhone 7 Plus, or a later model.
Step 4 - The screen will then show a notification confirming that the screenshot was successfully taken.
You can easily alter the screenshot later in the Photos app after wiping the original images from your iPhone. A lot less storage space will be required by the screenshot than by the original photographs.
Method 2: iPhone image size reduction using email
When you share photos using the Mail on Photos app, the iPad or the iPhone will ask you if you want to change the size of the selected photos or leave them as-is. Scaling iPhone images in such a way would be an optional means of lowering their size.
You can do this by following the guidelines below:
Step 1 - Start your iPad or iPhone's Photos app.
Step 2 - By accessing an album that contains the images you want to compress, pick out one or more images from it.
Step 3 - Click the Share key and select "Mail" to send the selected images to a recipient.
Step 4 - After entering your email address, the pop-up box will provide you with the option to select Small, Medium, Large, or Actual Size for your originally meant photo size.
Step 5 - By clicking the "Send" button, the photos will be compressed and sent to your email. After erasing the original photos from your smartphone, the compressed photos are downloaded to the Photos app.
Method 3: Use "Optimize iPhone Storage" to compress your iPhone's photo collection.
One of the most straightforward and fastest ways to compress iPhone photos is to employ the "Optimize iPhone Storage" option. This involves uploading or synchronizing the current pics from your iPad or iPhone online to iCloud storage.
The entire iPhone photo library will be compressed using this strategy. However, these pictures are still displayed as thumbnails in the Photos app. When you click on a photo to view it, it will download from iCloud and show the huge image, though occasionally, it may include a local copy.
In a nutshell, it can handle photographs stored locally and in iCloud. If your connectivity is quick and dependable, there won't be any problems (through Wi-Fi or cellular data).
However, you might not be able to use this strategy if your Internet connection is sluggish or your data plan isn't unlimited. Nevertheless, using the following techniques, you should be able to compress the picture in your iPhone's gallery:
Step 1 - Open the Settings app from the Home screen after your iPhone or iPad has been unlocked.
Step 2 - On the Settings page, select "Photos & Camera," then click the drop-down menu next to "Optimize iPhone Storage."
Step 3 - While your iPhone or iPad syncs the local photos to iCloud storage, the compressed images will stay on your iPhone or iPad.
Method 4: To reduce the size of images, use HEIF/HEIC images with iOS 11.
High-Efficiency Image Format, or HEIF, is a brand-new picture format (.heic) in iOS 11 that could assist you in compressing photos without losing the quality of the images. In light of this, Apple provides a solution for iOS 11-powered smartphones to the issue that photos take up a lot of storage space on iOS devices.
iPhone instantaneously snaps compressed photos and stores them in the Photos app without performing additional actions, which appears to be different from compressing the device's already-existing photos.
The size of the images captured will be reduced in the following ways if an iPhone is configured to generate HEIC/HEIF images:
Step 1 - Launch the Settings app from the Home screen on an iPhone or iPad running iOS 11.
Step 2 - Selecting "Camera" > "Formats" will give you access to the different camera capture formats "Most Compatible" and "High Efficiency."
Step 3 - Decide whether you want "High Efficiency" or not. It must be noted that employing the high-efficiency HEVC/HEIF format will aid you in shooting videos and photographs with smaller file sizes. For the 'Most Compatible' capture setting, always use JPEG/H 264.
It should always be mentioned that the only Apple Devices that are compatible with this method that is running iOS 11 are the iPhone X, iPhone 8 Plus, iPhone 8, iPhone 7 Plus, iPhone 7, iPad Pro (10.5 inches), iPad Pro 12.9 inch (2nd generation), and after. In iOS 11, HEIF is covered in all pertinent details.
Advantages of Compressing Your Photographs:
1. By making the files that store your photos smaller in size, you may be able to free up a significant amount of space on your iPhone. To preserve space, it is best to delete the original images and then purge the folder containing the deleted images.
Additionally, remember that a picture's quality will decline as its file size is reduced. As demonstrated below, one of these three images was reduced in size before being resized:
Originally 2.3 MB in size, photo 1 is now 155 KB
Formerly 2.2 MB, Photo 2 is now 293 KB.
Photo 3 was originally 1.7 MB but is now 207 KB.
2. Facebook, Twitter, and Instagram usage are all very common. It's something that most of us are somewhat familiar with. It's occasionally necessary for us to upload both individual and group photos on social media. If we compress the images, it will be easy for us to submit them at that time.
3. Many photo-editing apps are available to us. We occasionally actually do need to edit our photos. When we compress the images, it makes it simpler to modify them with image-editing tools.
Disadvantages of Image Compression
It makes use of the JPEG lossy compression technique.
Picture quality is diminished due to the direct loss of an image's actual content during JPEG compression.
It is strongly advised not to store images with angular edges and lines in JPEG format.
It is not possible to save layered images as JPEGs.
The Most Effective Approach to Determine an Image's Size
Since iOS 15, it has become easier to determine an image's size on an iPhone. There must have been an earlier shortcut. There are now only a few steps left to finish it.
Tap the information button at the bottom of the screen after choosing the photo or video by opening the Camera Roll. Done! Here, you may find information on the file's resolution, format, source, and weight.
You might have repeatedly tried using the basic phone features to resize photographs, but if the results were less than perfect, it would be wise to look for a good third-party programme straight once. To use the speedy resizing option, you can use our Shrink.media app and download it to your iPhone immediately.
These simple procedures will allow you to reduce or alter the size of photos on your iPad or iPhone. Now you know how to compress any image or a diverse number of images using our tool Shrink.media, but what about upscaling an image?
Here, we have listed some of the commonly asked questions from the community. If you do not find the information you need, feel free to reach out to us at support@pixelbin.io
Why do I Compress Photos on my iPhone?
Compressing photos on an iPhone can be beneficial for several reasons. Firstly, it helps to reduce the storage space occupied by photos on the device, allowing users to free up valuable storage capacity.
Secondly, compressed photos are easier and faster to share via email, messaging apps, or social media, as they require fewer data to transfer. Compressed photos are ideal for web uploads, where smaller file sizes ensure faster loading times, better user experience, and reduced data usage.
Does Apple compress files?
Yes, Apple uses compression techniques to optimize file sizes on their devices and services, such as iPhones and iCloud storage, to save space and improve performance while maintaining an acceptable image or video quality.
Is it good to Compress Photos?
Compressing photos can be beneficial in certain situations. It helps reduce file sizes, making storing, sharing, and uploading photos easier, especially when storage space or data usage is limited.
However, it's important to use reliable compression methods, such as those offered by Shrink.media or other reputable tools, to ensure that the quality and integrity of the photos are preserved during the compression process.
Does compressing photos reduce quality?
The compression process can reduce photos' quality if not done properly. However, using reliable and reputable compression tools like Shrink.media ensures that the quality of the photos is preserved during the compression process.
Shrink.media employs advanced image compression techniques that maintain the integrity of the image while reducing the file size, resulting in compressed photos that retain their original quality.
How do I reduce image size on iPhone?
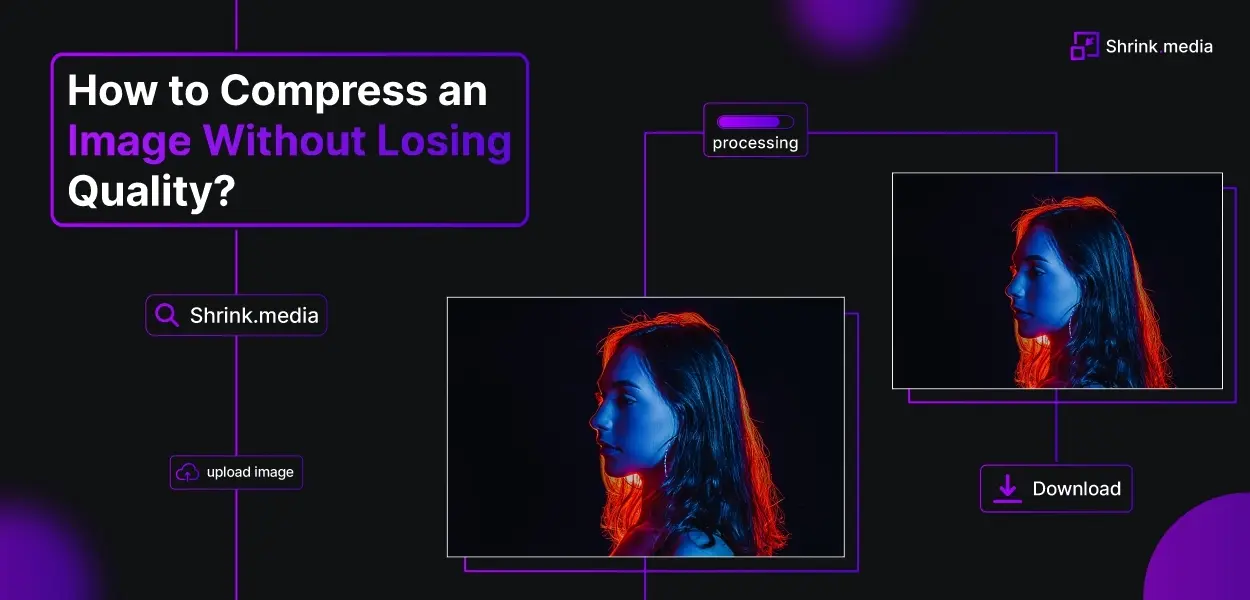
Here's a step-by-step guide on how to reduce image size on an iPhone using Shrink.media in a web browser:
Step 1: Open the web browser on your iPhone and go to the Shrink.media website, or download it from Appstore.
Step 1: Tap on the "Upload Image" or similar button to select the image you want to reduce in size.
Step 2: Choose the desired compression settings based on your preferences and requirements.
Step 3: Tap the "Compress" or a similar button to initiate the compression process.
Step 4: Wait for the compression process to complete, which may take a few seconds.
Step 5: Tap the "Download" button to save the compressed image to your iPhone's photo library.
Is it risky to compress files?
Compressing files using reputable tools like Shrink.media is generally safe and does not pose any risks to the quality of the files. However, it's important to always back up your original files before compressing them to avoid potential data loss. Shrink.media is designed to compress images without compromising their quality, making it a reliable option for reducing file size while preserving image integrity.