
How to Compress JPG Image to 200 KB Online with Shrink.media


Images are crucial in content creation and communication in today's digital world. However, high-quality images can be bulky and take up a lot of storage space, making sharing or displaying them online challenging. It is where image compression comes in, as it helps reduce the size of images without significantly impacting their quality.
Shrink.media is an image compression tool with several features to optimise and compress images effectively. With its ability to adjust image size and dimensions, users can ensure their images look great on any device or screen size. The tool's advanced compression algorithms also enable users to compress images without losing details or sharpness, making it an ideal tool for professionals and hobbyists.
Furthermore, the side-by-side comparison feature of the original and compressed images makes it easier for users to evaluate the compression's impact on image quality. With support for various image file formats, Shrink.media offers versatility and compatibility for various applications. Shrink.media is an excellent tool for optimising and compressing images for online sharing and display.
Understanding JPG Images
A JPG (Joint Photographic Experts Group) image is a digital file format that uses a lossy compression algorithm to reduce the file size without significantly affecting image quality. It is a popular format for photographs and other complex images, as it can compress images while retaining the details and colors that make the image visually appealing.
How does a JPG image work?
JPG images work by compressing the image data by removing redundant or irrelevant information and approximating the remaining data using mathematical algorithms. The compression process can result in a loss of quality, but it allows for smaller file sizes, making it easier to store and share images online.
Some characteristics of JPG images include:
- The compression rate is adjusted to balance image quality and file size.
- Supports millions of colours, making it ideal for photographs and complex images.
- It can be viewed on most devices and web browsers without additional software.
- It can be edited and saved multiple times without significant loss of quality.
Advantages of using JPG images include:
- Small file size, making it easy to store and share online.
- Retains a high level of detail and colour accuracy.
- Supports a wide range of devices and web browsers.
- Allows for easy editing and manipulation of images
Disadvantages of using JPG images include:
- Lossy compression can result in a loss of image quality.
- Limited support for transparency.
- Not suitable for images with sharp edges or text, as it can result in pixelation or blurring.
Why Compress JPG Images?
Compressing JPG images offers several benefits, including smaller file sizes, improved website performance, faster upload and download times, reduced bandwidth usage, maintained image quality, improved user experience, and increased accessibility.
With the growing importance of online content creation, optimising image file sizes has become essential to ensure fast load times, save storage space, and improve the overall user experience.
Benefits of compressing JPG images
Compressing JPG (Joint Photographic Experts Group) images is a common practice that offers several benefits. With the rise of digital photography and online content creation, optimising image file sizes has become essential to ensure fast load times, save storage space, and improve the overall user experience. Here are some of the benefits of compressing JPG images:
1. Smaller File Size: One of the most significant benefits of compressing JPG images is reducing file size. Compressed images take up less storage space, making them easier to store and share online. Smaller file sizes also lead to faster load times, which can improve website and app performance.
2. Improved Website Performance: Large image file sizes can slow down website load times, negatively impacting the user experience. Compressing images can significantly reduce load times, making the website more responsive and improving the user experience. Faster load times can also lead to better search engine rankings and increased traffic to the website.
3. Faster Upload and Download Times: Compressed images can be uploaded and downloaded faster than uncompressed images, making them ideal for online content creation. Faster upload and download times can improve productivity and save time, especially when working with large image files.
4. Reduced Bandwidth Usage: Compressed images require less bandwidth to upload and download, reducing the overall bandwidth usage. It can result in cost savings for businesses and individuals who pay for their internet usage by the amount of bandwidth used.
5. Maintained Image Quality: While compressing JPG images can result in a loss of quality, modern compression algorithms can reduce file sizes without sacrificing image quality. Compressed images can retain the original image quality, making them suitable for online sharing, printing, and other applications.
6. Improved User Experience: Fast load times, improved website performance, and reduced bandwidth usage can significantly improve the overall user experience. Compressed images can make the website or app more responsive, making users more likely to engage with the content.
7. Increased Accessibility: Compressed images can be accessed by more devices and web browsers, making them more accessible to a broader audience. It can improve the reach and impact of online content and make it easier for people with slower internet connections or older devices to access the content.
The Impact of Uncompressed JPG Images on Website Loading Speed
Uncompressed JPG (Joint Photographic Experts Group) images can significantly impact website loading speed, resulting in a negative user experience. Here are the five impacts of uncompressed JPG images on website loading speed:
1. Large file size
Uncompressed JPG images have large file sizes, which can slow down the website's loading speed. When a user visits a website that contains uncompressed images, their browser has to download the entire file, which can take a lot of time. The larger the file size, the longer it takes to download, resulting in a slower website.
2. Slow loading speed
Uncompressed JPG images can significantly slow down the website's loading speed. Slow-loading websites can result in frustrated users who may abandon the website before it finishes loading. Research has shown that website visitors expect web pages to load in under two seconds, and if the website takes longer, they are more likely to leave.
3. Poor user experience
Slow-loading websites can negatively impact user experience. Users who experience slow-loading websites are more likely to leave the website and may have a negative impression of the website. This can lead to reduced engagement, lower conversion rates, and negative reviews.
4. Lower search engine rankings
Website loading speed is a crucial factor in search engine rankings. Search engines like Google prioritise websites that load quickly, as it provides a better user experience. Websites that have slow loading speeds may be penalised by search engines, leading to lower search engine rankings and reduced visibility.
5. Reduced website performance
Uncompressed JPG images can significantly impact website performance. Large image files take longer to load, slowing down website performance. Search engines often penalise slow-loading websites, leading to lower search engine rankings and reduced visibility. In addition, slow-loading websites can also lead to reduced user engagement and lower conversion rates.
The Shrink.media Platform
Shrink.media is an excellent tool offering advanced features to compress your images to 200 KB without losing quality. It's free, fast, secure, and user-friendly.
With Shrink.media, you can compress any image file in various formats, making it an excellent tool for anyone needing to compress images regularly.
Features of Shrink.media
Shrink.media is an online image compressor that offers advanced features to reduce the image size to 200 KB. Here are some of the critical features of this tool:
1. High-Quality Image Compression: Shrink.media provides high-quality image compression, ensuring that your images' quality is not compromised during the compression process. Your compressed images will look as good as the original ones. The tool uses advanced algorithms to compress images without losing their quality or clarity.
2. Free and Fast: This tool is free to use and provides fast results. You don't have to pay anything to compress your images to 200 KB. The tool delivers results quickly, so you won't have to wait hours to get your compressed images. It's an excellent option for anyone who wants to quickly compress their images without spending money.
3. Secure Tool: The tool is built with advanced algorithms to protect the privacy and security of your pictures. Your uploaded images will be kept safe from unauthorised third parties, and your data will never be shared or disclosed for any reason. Once your images are compressed, they are immediately deleted from the servers to ensure maximum security.
4. User-Friendly Interface: Shrink.media has a user-friendly interface that is easy to use and requires no technical expertise. With just a few clicks, you can quickly compress your images to 200 KB. The interface is intuitive and user-friendly, making it accessible to anyone who wants to compress their images.
5. Multiple File Formats: The tool can compress images in various formats, including JPG, PNG, JPEG, and Webp. It means you can use it to compress any image file without worrying about compatibility issues. The tool supports multiple file formats, making it easy to compress any image you have.
6. Customisable Compression Settings: The tool allows you to customise the compression settings to suit your needs. You can adjust the image quality and dimension for the desired results. This level of customisation ensures that you can compress your images best for your specific use case. You can also preview the compressed image to ensure the quality you need.
7. Image Resizing: Apart from compressing your images, Shrink.media also allows you to resize your images. This feature is handy if you resize your images before compressing them. Depending on your needs, you can resize your images before or after compressing them.
8. Cloud-based: Shrink.media is a cloud-based tool, meaning you don't need to install any software on your computer. You can access the tool from anywhere, as long as you have an internet connection. It makes it convenient to compress your images, regardless of location.
Compressing JPG Images with Shrink.media
Compressing JPG images with Shrink.media is an easy and effective way to reduce the file size of your images, making them easier to share and upload online. With these step-by-step instructions, you can easily compress your images to 200 KB or less in just a few clicks.
Step-by-step instructions on how to compress a JPG image to 200 KB
Compressing JPG images can be an easy and effective way to reduce the file size of your images, making them easier to share and upload online. This guide will walk you through the steps to compress a JPG image to 200 KB using the Shrink.media tool.
Step 1 - Upload your image:
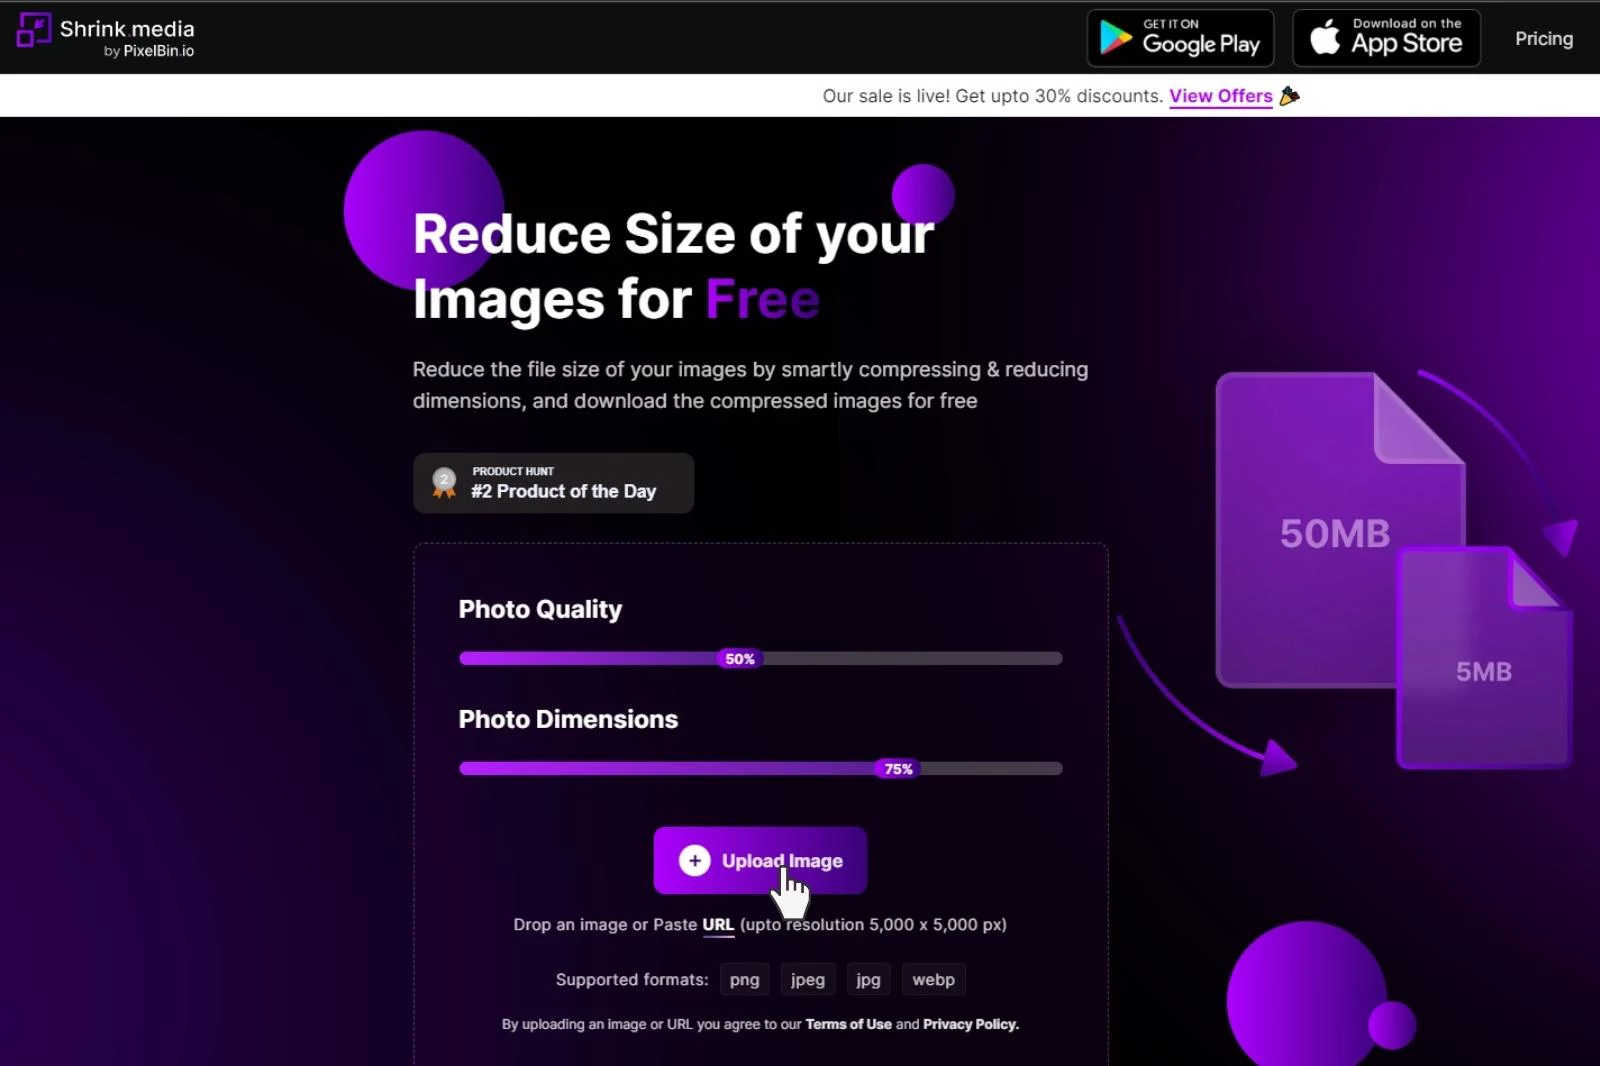
Firstly, go to the Shrink.media website and select the "Compress Image" option from the menu. Once on the page, click the "Upload Image" button to select the image you want to compress from your computer's local storage. Alternatively, you can drag and drop the image file onto the upload area.
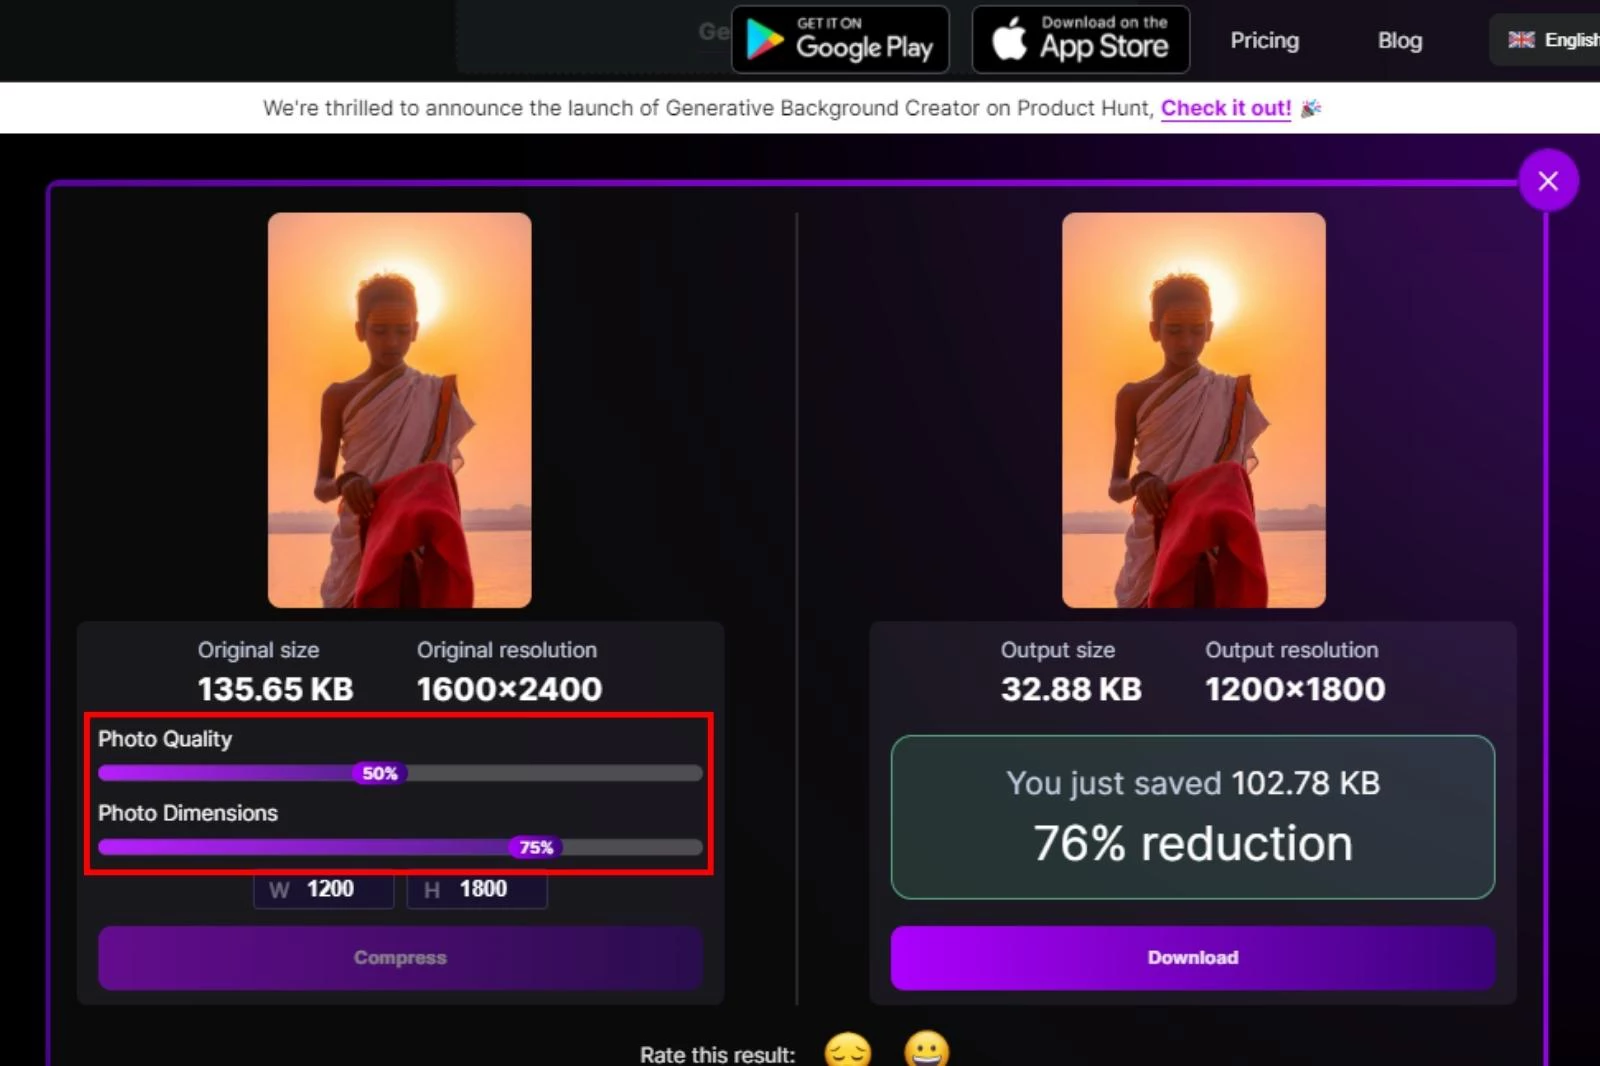
Step 2 - Compress your image:

Once the image is uploaded, Shrink.media will automatically compress it, and you can see the new, smaller file size on the page. The tool uses advanced compression algorithms to maintain image quality while reducing the file size, so you can be sure your image will look just as good as the original.
Step 3 - Adjust the image size (optional):
If the new file size is still too large, you can use the "Resize Image" option to adjust the dimensions of your image and compress it even further. Enter the desired height and width in pixels, and the tool will resize the image accordingly.
Step 4 - Download your compressed image:

Once you are happy with the compressed image, you can download it in various formats, such as JPEG or PNG, by clicking the "Download" button. You can save the file to your computer's local storage or upload it to a cloud storage service like Dropbox or Google Drive.
Alternative Methods for Compressing JPG images
While Shrink.media is an excellent tool for compressing JPG images, you can use other methods to reduce your images' file size. In this guide, we will explore some alternative methods for compressing JPG images.
Method 1 - Use image editing software:
Most image editing software, such as Adobe Photoshop, GIMP, or Paint.NET, allows you to compress JPG images by adjusting the quality settings. Open the image in your preferred software, and then use the "Save As" or "Export" option to save the image as a JPG file.
You can then adjust the quality settings to reduce the file size while maintaining the image quality. However, reducing the quality too much can result in losing image detail and clarity.
Method 2 - Use online image compression tools:
There are many online tools available that allow you to compress JPG images for free. For example, TinyPNG, CompressJPEG, and Kraken.io are all popular options. These tools use advanced compression algorithms to reduce the file size while maintaining image quality. However, remember that uploading your images to these online tools may compromise your privacy, as they will have access to your images.
Method 3 - Use command-line tools:
Command-line tools such as ImageMagick can compress JPG images for more advanced users. These tools allow you to specify the compression settings and optimise the image for web use. However, using command-line tools requires technical knowledge and may only suit some.
Method 4 - Use plugins:
Using image editing software such as Adobe Photoshop, you can also use plugins to compress your JPG images. Plugins such as JPEGmini or Imagenomic Noiseware allow you to compress your images while maintaining the image quality. However, these plugins may require a subscription or payment.
Method 5 - Use compression apps:
Many compression apps are available for mobile devices that compress JPG images. Apps such as JPEG Optimizer or Photo Compress 2.0 are popular options. These apps are easy to use and allow you to compress your images on the go. However, remember that using these apps may result in losing image quality.
Additional Tips for Compressing JPG Images
Optimising JPEG images is essential to improving website performance and user experience. By following these best tips, you can reduce the file size of your JPEG images while maintaining image quality, resulting in faster page loading times and improved website performance.
Best practices for optimising JPG images
JPEG (Joint Photographic Experts Group) is a popular image file format used widely on the web. However, large and uncompressed JPEG images can slow down website loading time, negatively impacting the user experience. To optimise JPG images for faster loading times and better website performance, here are eight best practices:
1. Use a compression tool: To reduce the file size of your JPEG images, use a compression tool like Adobe Photoshop, GIMP, or TinyPNG. These tools allow you to adjust the compression settings to find the right balance between file size and image quality.
2. Choose the correct format: JPEG is sometimes the best format for all images. If your image has few colours and simple graphics, you might consider using PNG or GIF instead of JPEG.
3. Resize the image: Before compressing your JPEG image, ensure it is the right size for your website. A large image resized using HTML or CSS still requires a large file size, which can negatively affect page loading time. Resize the image using an image editor to the exact size you need.
4. Optimise the compression level: The compression level determines how much data is lost in the compression process. A higher compression level results in a smaller file size but can also result in lower image quality. Test different compression levels to find the right balance between image quality and file size.
5. Remove unnecessary data: Remove any unnecessary metadata, comments, or colour profiles from your JPEG images to reduce their file size. It can be done using image editors like Adobe Photoshop or online tools like ImageOptim.
6. Use progressive loading: Progressive loading allows your website to show a low-resolution version of the image first and then load a higher-resolution version as the user scrolls down. This technique can improve page loading time and user experience.
7. Consider using a content delivery network (CDN): A CDN can store your website's images on multiple servers worldwide, reducing the load time for visitors.
8. Use lazy loading: Lazy loading delays the loading of images until the user scrolls down to the image. This technique can improve page loading time, especially for long pages with many images.
Common mistakes to avoid when compressing JPG images
JPEG (Joint Photographic Experts Group) images are commonly used on websites, and compressing them is a great way to reduce their file size without compromising their quality.
However, when compressing JPEG images, it's essential to avoid common mistakes that can lead to poor image quality or unexpected results. Here are eight common mistakes to avoid when compressing JPEG images:
1. Saving a compressed image in JPEG format: When you save a JPEG image, it compresses the image using lossy compression, which results in a loss of image quality. When you compress an already compressed JPEG image, the quality will degrade further. Therefore, it's essential to save your compressed image in a different format, such as PNG, to avoid losing more image quality.
2. Overcompressing: Overcompressing a JPEG image can result in an image with poor quality and visible artefacts. Therefore, it's essential to find the right balance between file size and image quality when compressing a JPEG image.
3. Not optimising the compression settings: JPEG compression settings can significantly affect image quality and file size. If you optimise these settings, you may end up with an image that is too large or compressed, resulting in a better user experience.
4. Not resizing the image: If you don't resize an image before compressing it, the compressed image may still have a large file size. Therefore, resizing the image to the appropriate size is essential before compressing it.
5. Not removing unnecessary data: JPEG images often contain metadata and other information not necessary for display. Removing this unnecessary data can significantly reduce the file size of the image.
6. Using the wrong compression tool: Different compression tools have different compression algorithms, and only some algorithms work well for some images. Therefore, using the right compression tool for the type of image you're compressing is essential.
7. Not considering the image's purpose: If you're compressing an image for use on a website, you should consider the image's purpose. Images used as thumbnails or background images may require a different level of quality than images used as product images.
8. Not testing the compressed image: After compressing an image, it's essential to test the image to ensure that the quality is acceptable and that it loads quickly on the website. If the image quality or loading time isn't acceptable, you may need to adjust the compression settings or consider a different compression tool.
Comparing Image Compression Techniques
Image compression is a process of reducing the file size of an image while preserving its visual quality. There are two types of image compression techniques: lossless and lossy. This article will compare these two techniques and determine the best compressing JPG images.
Comparison of lossy and lossless compression techniques
1. Lossless Compression Technique
Lossless compression is a technique that reduces the file size of an image without any loss of visual quality. The compressed image is decompressed to its original form without data loss. This technique is helpful for images with text or graphics requiring high accuracy.
The most common lossless compression techniques are PNG and GIF. These formats use a " run-length encoding technique," compressing the image by identifying long strings of identical pixels and encoding them as a single value. This technique is particularly effective for images with large areas of uniform colours, such as line art, logos, and diagrams.
2. Advantages of Lossless Compression Technique
The main advantage of lossless compression is that it preserves the image's original quality. This technique benefits images requiring high accuracy, such as medical images, scientific data, and legal documents.
3. Disadvantages of Lossless Compression Technique
The main disadvantage of lossless compression is that it doesn't provide as much compression as lossy compression. It means that the file size of the compressed image will still be relatively large, making it unsuitable for web applications.
4. Lossy Compression Technique
Lossy compression is a technique that reduces the file size of an image by removing some of the data deemed less critical to the overall visual quality. This technique benefits photographic images, where the overall visual effect is more important than the individual pixels.
The most common lossy compression technique is JPEG. This format uses a technique called "discrete cosine transform," which compresses the image by dividing it into small blocks and transforming each block into a series of coefficients representing the image's frequency spectrum.
5. Advantages of Lossy Compression Technique
The main advantage of lossy compression is that it provides much higher than lossless compression. It means that the file size of the compressed image is much smaller, making it suitable for web applications.
6. Disadvantages of Lossy Compression Technique
The main disadvantage of lossy compression is that it can result in a loss of visual quality. This means the compressed image may have artefacts or other distortions affecting its overall visual quality.
Which Technique is Best for Compressing JPG Images?
When compressing JPG images, the best technique depends on the image's intended use. Lossless compression is the best technique if the image requires high accuracy and is not intended for web applications.
On the other hand, if the image is intended for web applications and the overall visual effect is more important than the individual pixels, then lossy compression is the best technique. The JPEG format is the most common lossy compression technique for compressing JPG images.
Conclusion
Compressing JPG images can have numerous benefits, including reducing file size, increasing website loading speed, and saving storage space. Shrink.media is an excellent tool for image compression that offers various features, including the ability to adjust image size and dimensions, choose compression level, and preview compressed images before downloading.
In summary, compressing JPG images can have significant advantages, and Shrink.media is an efficient and user-friendly tool to accomplish this task. Its numerous features and ease of use make it a great option for individuals and businesses looking to optimise their image compression process.
FAQ's
Bagaimana caranya kompres jpg menjadi 200 kb?
Berikut adalah langkah-langkah yang mudah untuk mengompres file JPG menjadi 200 KB menggunakan Shrink.media:
Langkah 1: Buka situs Shrink.media di browser Anda.
Langkah 2: Klik tombol "Unggah" dan pilih file JPG yang ingin Anda kompres dari komputer Anda.
Langkah 3: Setelah file diunggah, sesuaikan penggeser untuk mendapatkan gambar sekitar 200kb. Shrink.media akan otomatis memulai proses kompresi.
Langkah 4: Setelah proses selesai, klik tombol "Unduh" untuk menyimpan versi JPG yang sudah dikompresi dengan ukuran sekitar 200 KB ke komputer Anda.
Dengan mengikuti langkah-langkah ini, Anda dapat dengan mudah mengompres file JPG menjadi 200 KB menggunakan Shrink.media.
How to compress jpg online?
To compress JPG online, Shrink.media is a highly recommended tool. Simply visit the Shrink.media website, upload the JPG file you want to compress, and let the tool perform the compression. Shrink.media is known for its efficiency in reducing file sizes while maintaining image quality.
How to compress jpg image online?
To compress a JPG image online using Shrink.media, follow these steps:
Step 1: Visit the Shrink.media website using your preferred web browser.
Step 2: Click the "Upload" button and select the JPG image you want to compress from your computer.
Step 3: Once the image is uploaded, Shrink.media will automatically begin the compression process.
Step 4: After the compression is complete, click the "Download" button to save the compressed JPG image to your computer.
Following these steps, you can easily compress a JPG image online using Shrink.media.
How much can jpg compress?
JPEG compression can significantly reduce file size by employing lossy compression techniques. Depending on the level of compression chosen, a JPEG image can typically be compressed by 10-90% while retaining reasonable image quality, allowing for smaller file sizes compared to the original uncompressed version.
How do I compress a photo to 200 KB?
To compress a photo to 200 KB, you can use a tool like Shrink.media, known for its effective compression capabilities. Simply visit the Shrink.media website, upload the photo you want to compress and adjust the settings or quality to achieve the desired file size. Shrink.media will then process the photo and provide a compressed version of around 200 KB.
How many pixels is 200kb?
The number of pixels in a 200 KB image can vary depending on the format and compression settings. Determining the exact number of pixels is only possible based on the file size. The pixel dimensions of an image determine its size, while factors like image content, compression level, and image format influence the file size.
Bagaimana caranya kompres jpg menjadi 200 kb?
Berikut adalah langkah-langkah yang mudah untuk mengompres file JPG menjadi 200 KB menggunakan Shrink.media:
Langkah 1: Buka situs Shrink.media di browser Anda.
Langkah 2: Klik tombol "Unggah" dan pilih file JPG yang ingin Anda kompres dari komputer Anda.
Langkah 3: Setelah file diunggah, sesuaikan penggeser untuk mendapatkan gambar sekitar 200kb. Shrink.media akan otomatis memulai proses kompresi.
Langkah 4: Setelah proses selesai, klik tombol "Unduh" untuk menyimpan versi JPG yang sudah dikompresi dengan ukuran sekitar 200 KB ke komputer Anda.
Dengan mengikuti langkah-langkah ini, Anda dapat dengan mudah mengompres file JPG menjadi 200 KB menggunakan Shrink.media.


